Showing posts with label Timeless Type Junior Alphabet. Show all posts

Saturday, November 6, 2010

Dog Scrapbook Page

Two scrapbook pages in two days - what's going on! This page was done for a class that will be taught next week (so if you are interested in attending the class - you can see my website for details or email me). Anyway back to my page - it was done using the lovely D is for Dog stamp set and I decided to use photographs from our lovely farm dog Dinny, who sadly after +14 years of being a cattle dog died in July this year. These photographs were taken in January 2010 when we visited the farm, our son loved sitting on the dog bed patting and chatting to him, not realising that Dinny was completely deaf!


I wanted to give the effect of having a dog collar on the page, so used the circle scissors plus to cut a 5" circle an then used a sponge to age it and a chocolate chip marker to draw on faux stitching. The dog tag was made using the stamps from the set and held on using a loop of card stock and hemp twine.


There is journaling room on a pull out sheet behind the main photograph - I used the same dog stamp image on the journaling area as in the centre of the dog collar. I also thought of adding a few bone stamps on the page, but as Dinny has an "i" in it - I used it on the title instead along with letters cut from the Junior Timeless Type alphabet.


I sponged all of the edges of the 12"x12" page with chocolate chip ink as well. The random paw prints going across the page were originally just going to be a tidy border, but as Dinny had a mind and personality all of his own, I figured he wouldn't have just staying walking in one straight line! The punch art puppy dog is not my design, it is from Valita's blog, isn't he cute?


Stamps: D is for Dog, Just Believe
Card Stock: Very Vanilla, Chocolate Chip, Crumb Cake, Basic Black
Ink: Chocolate Chip
Accessories: Scallop square punch, 1 1/4" circle punch, 1 3/8" circle punch, 3/4" circle punch, small oval punch, large oval punch, 1/16" handheld punch, hemp twine, Dimensionals, SNAIL, Chocolate Chip marker pen, white gel pen, stamping sponge, paper snips, round tab punch, Junior Timeless Type Alphabet, circle scissors plus
Non SU: single hole punch


Friday, November 5, 2010

Spring Scrapbook Page

Well spring has sprung with a vengence - to be honest it felt like we had skipped spring and gone straight to summer this week with a 37'C day - thank goodness for airconditioning & photo voltaic panels is all I can say! However I digress, I made a scrapbook page (I know so unlike me), actually I was asked to do a "yellow" page for a class and found it a bit challenging so it metamorphasised into a "spring" page with yellow daffodils! What do you think?


 The orange photo matt area opens out to reveal another area for journalling and a second 6"x4" photograph.

The daffodils are very simple punch art using the five petal flower punch and one of the flowers in boho blossoms, the stems and leaves are just hand cut and the dots drawn on in white gel pen. The small daffodils on the foled out page for journalling were made using one of the boho blossom flowers and the centre was a single hole punch circle.


I LOVE the embosslits buttefly die so they get included on lots of my items now, as are the basic pearls! The sun was cut with the circle scissors and sponged with ink.

Stamps: Cute as a Bug
Ink: Pumpkin Pie & Basic Black
Card stock: Daffodil yellow, Pumpkin Pie, Old Olive, Certainly Celery & Bashful Blue
Accessories: Embosslits Beautiful Butterfly, Circle Scissors plus, basic pearls, white gel pen, SNAIL, boho blossoms punch, round tab punch,  Timeless Type Junior Alphabet, 2 way glue pen, stampin sponges, bone folder, mat pack.
Non SU: single hole punch

Overall I liked the finished page and think I might make a matching one for a 2 page layout (I'm not a fan of single pages). I'm thinking of making the Jonquil daffodils on the second page, similar to those on the fold out journalling page - what do you think? Now I just have to sort out some photos to suit the layout theme. If you would like to do this as a class for a double layout let me know - if you want to do it as a single page then you can join us on Friday next week as I am teaching it then!

Saturday, October 2, 2010

Pink Baby Butterfly Card - Big Shot style!

Well my friends babies are all coming thick and fast at the moment - one gorgeous little boy and three adorable girls in the last fortnight (all to separate parents I should add - not quads!). I made a card using the Big Shot and the new Beautiful Wings embosslit die - it's so nice, it cuts and embosses 5 butterflies all in one go. So thus inspired I made a clean and simple card using them.


Stamps: Teeny Tiny Sentiments
Paper: Very Vanilla & Pretty in Pink
Ink: Elegant Eggplant & Pretty in Pink
Accessories: Big Shot, Textured embossing folder Perfect Polka Dots, Beautiful Wings embosslit, Timeless Type Junior Alphabet, Scallop Oval punch, Window Word punch, Basic Pearls, SNAIL, Dimensionals, Stamping sponges

I don't own the modern label punch (yet) so I cut the scallop oval punch down on either side to create a boarder for the window word punch. Here's a close up of the very cute embossed butterflies:


Doesn't the embossing on the card stock make it look fantastic? I only adhered the centre of the butterflies down as I wanted to leave the wings free to give the impression of flight. 

Saturday, September 18, 2010

ESAD Blog Hop - Snorkelling Scrap Pages & Butterfly Writing Set

Okay so who isn't loving everything in the new Stampin' Up! catalogue? If you have just joined the blog hop or have come here from the super talented Susan Joyce I hope that you are enjoying some terrific ideas for how to use those Big Shot dies! So get a cuppa and enjoy the journey as I hope you’re ready for the ESAD Big Shot Blog Hop!

What is ESAD?
ESAD stands for Extra Special Australasian Demonstrators and it is an online group just for Australian and New Zealand demonstrators for Stampin’ Up! We so love what we do and not only do we love to share it with our customers, friends, and wonderful blog visitors but we share our love for what we do with each other as Demonstrators. We run swaps, challenges, tutorials, product know how and cyberstamps and we are always there to help and support each other when its needed.
So if you are a Stampin’ Up! Demonstrator located in Australia or New Zealand then please feel free to click here to join our wonderful group.

I have created two different projects for this blog hop, the first is a scrap page layout using the Circles #2, Timeless Type Junior Alphabet  & Top Note dies for the super versatile Big Shot & the second is a writing compendium using the Beautiful Wings Embosslit and the Elegant lines textured impressions embossing folder.


I took inspiration for this layout from the new Celebrations DSP and extended the circle theme across the pages using the Circles #2 die, the Top Note die photos I hand cut off the perforated edge of the die to create a border around each photo. I also stamped a few of the bashful blue circles with a stamp from Circle Circus to continue the theme of the DSP.
  

Stamps: Circle Circus
Ink: Real Red
Paper: Celebrations DSP, Real Red, Bashful Blue, Pacific Point, Pear Pizzazz DSP from DSP  ( level 1 hostess).
Accessories: Big Shot, Circles #2, Timeless Type Junior Alphabet,Top Note, Circle Scissors, SNAIL, Paper snips, Stampin' write journaler, 2-Way glue pen, 

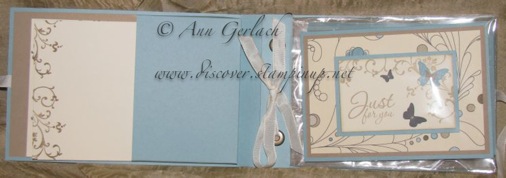
The second project is a writing compendium based on a design by Andrea Walford that I originally made in June and have remade using products from the new catalogue. It is a lovely gift as it is a compendium that holds 4 cards and envelopes all on the same theme. I chose to use the new elegant lines embossing folder which is so gorgeous and the new Elegant Soirée DSP with the new Beautiful Wings embosslits which is such awesome value - I totally love it.


Wouldn't this make the most wonderful gift? I also used the new basic pearls to embellish the cards. It's hard to see with my photography, but the embossing is so deep, it's just gorgeous and when you emboss on plain white or vanilla card stock and sponge over the top, the design pops out and looks fantastic. 


This is what the inside of it looks like:


Here's a close up of one of the cards as well - how terrific is it that Crumb Cake (kraft) is now available in an ink pad!


Stamps: Elements of Style, Afterthoughts (level 1 hostess)
Ink: Soft Suede, Basic Gray, Crumb Cake, Baja Breeze
Card Stock:Very Vanilla, Baja Breeze, Crumb Cake, Soft Suede, Basic Gray, Elegant Soirée DSP
Accessories: Paper piercer, Stampin' Dimensionals. Very Vanilla taffeta ribbon, 1" circle punch, 1 1/4" circle punch, Stamping sponges, SNAIL, Scallop edge punch, Crop-o-dile, Jumbo eyelets pewter, Sticky Strip, Basic Pearls.

Anyway congratulations for getting this far through my post! If you have any questions or comments please feel free to contact me and I will try to help out, I do have scrapbook, card and gift set classes like the above running regularly, for a calendar of events, please check my website. The next blog to hop on over to is that of Dani Fender  and you are going to love what she has made!