Showing posts with label Baby card. Show all posts

Wednesday, August 31, 2011

Star Card

I made a card to match the box from my last post (it should have gone up sooner but I managed to pick up a nasty bug from doing parents help in my childs' class which has put me out of action for a few days this week - why do parents send their children to school sick - it just infects everyone else - sorry rant over!). This card isn't hard, you have to make sure that all of your scoring is accurate otherwise it won't hold together accurately.


Stamps: Perfect Punches,
Ink: Basic Black & Real Red
Card Stock: Real Red, Whisper White & Newsprint DSP
Accessories: Decorative label punch, Oval XL punch, Dimensionals, SNAIL, Sticky Strip, stamping sponge.

Monday, January 10, 2011

Baby Steps Congratulations

Well two more friends had babies in the last month and this was one of the congratulations cards I made for their arrival. I love the a la carte stamp range and who doesn't love elephants??? Following the flip/swing card I made last month I used the same template to whip up this card.......


What you can't see from my photo is that I re-stamped the Elephant ears on scrap white card stock and made them into little 3D ears that can flap to give it even more dimension. The reverse of the elephant was done similar to the previous card with a balloon aqua painted.

Stamps: Crazy For Cupcakes & Baby Steps
Ink: Bashful Blue & Chocolate Chip.
Card stock: Whisper White, Bashful Blue & Chocolate Chip
Accessories: SNAIL, stamping sponges, aqua painter brush

Saturday, October 2, 2010

Pink Baby Butterfly Card - Big Shot style!

Well my friends babies are all coming thick and fast at the moment - one gorgeous little boy and three adorable girls in the last fortnight (all to separate parents I should add - not quads!). I made a card using the Big Shot and the new Beautiful Wings embosslit die - it's so nice, it cuts and embosses 5 butterflies all in one go. So thus inspired I made a clean and simple card using them.


Stamps: Teeny Tiny Sentiments
Paper: Very Vanilla & Pretty in Pink
Ink: Elegant Eggplant & Pretty in Pink
Accessories: Big Shot, Textured embossing folder Perfect Polka Dots, Beautiful Wings embosslit, Timeless Type Junior Alphabet, Scallop Oval punch, Window Word punch, Basic Pearls, SNAIL, Dimensionals, Stamping sponges

I don't own the modern label punch (yet) so I cut the scallop oval punch down on either side to create a boarder for the window word punch. Here's a close up of the very cute embossed butterflies:


Doesn't the embossing on the card stock make it look fantastic? I only adhered the centre of the butterflies down as I wanted to leave the wings free to give the impression of flight. 

Wednesday, September 15, 2010

Another Baby Card - Coveralls this time!

Yes it's another baby card, but this time not a pink bow or Big Shot die in sight, it was specially made for a friend who had a gorgeous little baby boy on Friday (both are doing well). I saw this card design ages ago on Susan Joyce's blog and flagged it to CASE as I just loved it. Unfortunately I did use retired DSP & the retired star punch and greeting as my new stuff hadn't arrived last week when I made the card, but you could easily substitute any DSP............I think it would also make a pretty awesome toddler birthday card by changing the stamp sentiment, I am hoping to remake it as soon as my Celebration DSP arrives (I so love the colours on that new DSP). Anyway enough waffle - here's the card:


So what do you think? Pretty cute isn't it - a real boy boy's card! The faux star buttons were made using 3 layers of card stock glued together and punched with the 1/16" handheld punch and then finished with a covering of crystal effects over the top. The DSP was sponged all around the edge and the tag pockets and turn ups were edged with faux stitching using a Chocolate Chip marker pen.


Stamps: Punches Three (retired hostess level 1)
Card Stock: Chocolate Chip, Whisper White, Pacific Point & Good Morning Sunshine DSP (retired)
Ink: Chocolate Chip Stampin' Write marker, Pacific Point.
Accessories: Small Star punch (retired), Large Tag punch, SNAIL, Stamping Sponges, Crystal Effects, Oval Extra-large punch, Stampin' Dimensionals, 1 1/4" circle punch.

Thursday, August 12, 2010

More baby cards!

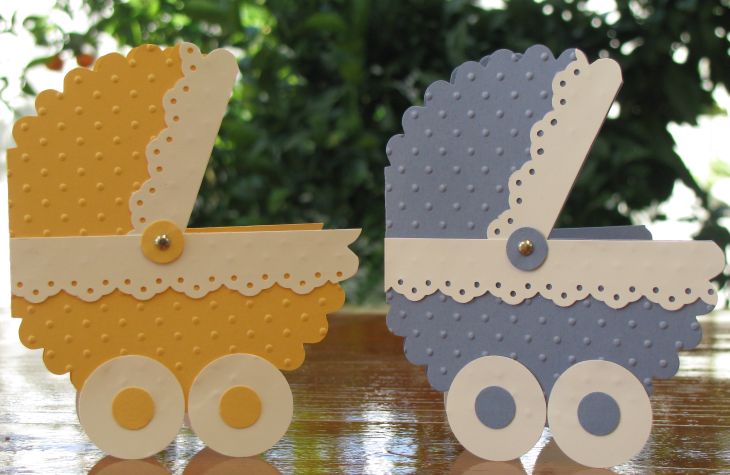
Well my baby card theme is continuing as I saw some amazingly cute  baby buggy cards on SCS and blogs done with the Big Shot - I thought they looked lovely anyway! I have no idea who came up with the idea first as there are over 200 examples of it and I couldn't find who did it first, so if it was you - let me know and I'll be happy to give you credit for it. They were really simple to make as well thanks to the aforementioned die cut machine, the Big Shot - I love it, makes creating very simple at times!
Anyway these baby buggys are so simple it's a matter of scoring and folding them in half, putting through the scallop circle die (ensuring you don't cut a complete circle so as the card still opens, I think I left 5 scallops of the die not covered by folded part of the card stock when I put it through the Big Shot). I then re-ran the front of the card through the Big Shot with the polka dot textured embossing folder (don't do the entire card as then it'll make it hard to write on). The wedge cut out of the card is approximately 5 scallops wide and to the centre point.


Card stock: Apricot Appeal, Brocade Blue & Whisper White.
Accessories: Big Shot die cut machine, polka dot textured embossing folder, scallop circle, 1/2" circle punch, silver brads, Eyelet border punch, 1 1/4" circle punch, SNAIL.

Thursday, July 15, 2010

Baby Card

Well it seems a lot of my friends are expecting additions to their families in the next few months (seven so far including a set of twins!) - so I thought I would get a start on some of their cards - well that and I have a baby card class coming up at the end of the month (see my website calendar for details) and wanted to make some new cards for it. Anyway I've seen lots of these baby onesie type cards floating around on blogs and had a hand at making some earlier in the week.......

A close up of the centre piece - it's textured by using a paper piercer to go around the scallop circle. The circle piece is sponged with Old Olive ink and then the layered piece is raised up with Stampin' Dimensionals to give the card more interest.


I remade it reversing the colours - but instead of going over the base cardstock with a jumbo roller wheel, I scored it uniformly to form lines - it made a nice textured piece of cardstock which I thought gave it a different look to just stamping over the card.


I had planned to make a third version using designer series paper on the front - so it would then give me three different looks for one card style - but I've been time anemic due to school holidays. Once I had sorted out the positioning of the punches to get the legs right, the rest of the card was easy. For sticking on these little bits like the scallop trim I tend to find the Tombow multi purpose adhesive to be really good, although it takes a minute or so to dry.

Stamps: Best Yet (hostess level 1) & See You Around Jumbo wheel (for first card)
Cardstock:  Old Olive & So Saffron
Ink: Old Olive
Accessories: 1 3/8" circle punch, scallop circle, single hole punch (non SU), paper piercer, mat pack, Stampin' Dimensionals, Tombow multi purpose adhesive, scoring blade on Fiskers cutter, Stampin' sponge.