Showing posts with label Circle Scissors. Show all posts

Friday, February 24, 2012

Ships Wheel

I love it when Stampin' Up! release a new suite of items and in the Summer mini the Nautical suite is awesome - a masculine suite of DSP, stamps & Bakers Twine - what's not to love?? This is my version of a card I saw online, but I modified it to fit a standard card size and used masking and sponging to get the background around the ship. The circles were cut with the Circle Scissors Plus and the wheel spokes with a punch, the dots didn't show up very well, but they are mini silver brads.


Stamps: Open Sea & Teeny Tiny Sentiments
Ink: Not Quite Navy, Daffodil, Pumpkin Pie
Card Stock: Cherry Cobbler, Whisper White, Not Quite Navy
Accessories: Modern label punch, Word Window Punch, white gel pen, mini silver brands, 1/16" handheld punch, Dimensionals, Circle Scissors Plus, stamping sponge, 1 1/4" circle punch

Monday, December 12, 2011

Christmas Scrapbook Layout 2011

I know I promised Christmas cards, but I just finished the scrapbook layout for Tuesdays class, so thought I would share that instead! There are still spots for the class if you want to come along - just let me know ASAP! I kept the layout fairly simple as for Christmas I think that the photographs are the most important element so they should dominate the space and journalling. 


I wanted to show off the new Silver Glimmer paper from the new Summer mini catalogue and added strips of it cut with the Tasteful Trim die, the new postage punch and the heel and toes of the stockings. The Baja Breeze circle that I cut with the Circle Scissors Plus to go inside the Scallop Circle Die for the year was 4" diameter. Extra journalling could be done in white gel pen on the Night of Navy card stock as well.


I chose not to title it with anything other than the year as I felt that the stockings hanging and the Christmas postage bauble stamp told the story better (as will the photographs - we got our first Santa photo today & it wasn't blue and silver!!!). I used the relief cut out of the Tasteful Trim die to border the DSP on this page as I didn't want to waste any of the gorgeous Silver Glimmer paper - did I ever tell you I was 1/4 Scottish!


I am not sure if you can see from the photographs (sorry taken at night so not the best), but each of the stocking tops have our names written on them - if you have a bigger family, then you can just add more stockings! I also added a few basic rhinestones on the stockings to add to the sparkle of the page. Most of the Baja Breeze will be covered by the photographs, but there will be enough left to give a slight contrast. The stockings are suspended by some white Bakers twine - how awesome is that stuff - 23m for just $4.95 - bargain of the year I say!

Stamps: Stitched Stockings, Merry & Type
Card Stock: Night of Navy, Baja Breeze, Whisper White. Regals DSP Patterns stack & Silver Glimmer Paper
Ink: Night of Navy (ink pad & marker)
Accessories: Big Shot, Tasteful Trim Die, Scallop Circle Die, Square Scallop Die, Circle Scissors Plus, Junior Timeless Type Alphabet, White Bakers Twine, basic rhinestones, 1" square punch, 1 3/8" square punch, postage stamp punch, Stocking builder punch.


Thursday, September 15, 2011

Water coloured Ute

This was a card we made at a water colouring class a while back, we were trying out all the different ways to colour with Stampin' Up! products e.g. water colour crayons, Classic ink pads, Stampin' write marker pens, blender pens, water colour pencils, Aqua painters, pastels - so many different combinations! This was a fun card that the participants could make up and depending upon the colours chosen and the sentiment would have been suitable for many different occasions.


Stamps: Loads of Love, Loads of Love Accessories
Ink: Black Stazon, Always Artichoke
Card Stock: Crumb Cake, water colour paper,  Not Quite Navy
Accessories: Circle Scissors Plus, Real Red striped grosgrain ribbon, stamp-a-ma-jig, Dimensionals, SNAIL, water colour crayons, Aquapainter.

Friday, June 17, 2011

Vintage Owl Flowers

I was inspired by a card made by LeeAnn that I saw about a year ago to turn the body of the owl punch into a flower, so I remade it with the materials I had and this is how it turned out:


Pretty nice hey? I love those antique brads and the Love Letter designer paper. I'm not sure if you can see on the right hand side, basically I cut a 'v' shape out of the top of the owl body and then folded up each of the bottom sides to make each petal - the flower I made has six such petals with the brad in the centre. Then I added it to a card.


Stamps: Tiny Tags
Ink: Riding Hood Red & Basic Black
Card Stock: Very Vanilla, Riding Hood Red, Love Letter DSP & Basic Black
Accessories: Striped grosgrain ribbon, Victorian Lace, Vintage Trinkets, Jewelry tag punch, 1/16" handheld punch, Circle Scissors Plus, Dimensionals, Big Shot, Textured Impressions Embossing Folder Elegant Lines, Antique brad, SNAIL.

Saturday, April 30, 2011

Strength & Hope Tri-Fold Card

There is a lovely new stamp set in the new Autumn-Winter mini catalogue on page 23 called Strength and Hope, Stampin' Up! is donating $2 from the purchase of this set (clear or wood mount) to The Breast Cancer Research Foundation (BCRF). The BCRF is dedicated to preventing breast cancer and finding a cure in our lifetime by funding clinical and translational research worldwide.  If you would like to purchase the set, get ideas for using it or earn it for free at a workshop contact me now to book a date!

I used it to make up another tri-fold card after my previous one worked out so well, but this time I took the colour scheme from the Elegant Soiree DSP (I do that frequently when I am stuck for colour schemes - go and look at the colours used in the designer papers and use those!).


I stamped the word image in the set multiple times to cover the Very Vanilla circle that I had cut with the Circle Scissors Plus. All of the flowers and pieces were sponged around the edges and I added basic rhinestones to the centre of the flowers (they work out so cheap - $9.50 for 150 rhinestones!!). Here's another view of it, so you can see the centre panel is plain Very Vanilla and stamped each end with the scroll/flourish from the set. If you want to make this card - I have a template in PDF form for the Australian standard size measurements so if you want a copy email me.


Stamps: Strength & Hope
Card Stock: Very Vanilla, Soft Suede, Elegant Soiree DSP, Crumb Cake, Baja Breeze.
Ink: Crumb Cake, Baja Breeze, Soft Suede
Accessories: Big Shot, Scallop Circle die, Little leaves die, Birds & Blooms, Corner rounder punch, paper snips, SNAIL, Victoria Crochet Trim, Hemp Twine, 1" circle punch, 1 1/4" circle punch, 1/16" hole punch, basic Rhinestones, Stamping sponges.

Saturday, March 19, 2011

Toy Story Buzz Light Year Punch Art

I saw this idea on a blog hop about 6 months ago on Ellen K's blog, but it has taken me this long to find the time and reason to make it up. My son was invited to a Toy Story themed 5th birthday party so of course I "had" to make this card and matching gift bag..............


Too cool aren't they? I was pleased with how they turned out and made a bit of a change when placed amidst all the commercial Toy Story stuff - not entirely sure if is was a welcome change or not as some people don't 'get' handmade, but you get that! The bag contained a squirter duck on a soap pond that had some money coins immersed in it as well - with the idea being you discover the money when you are washing your hands or self in the bath. I've made several of these over the years and generally the kids love them as they don't realise there is money in it until they are part way through using it. For the parents the best part is that it is useful & will eventually vanish leaving no mess and the packaging is recyclable either via re-gifting or in the normal weekly recycling collection - I love gifts that don't take up any space or break!

These two Buzz's contained more punches than I care to remember using last night, but the result was totally worth it and although a bit fiddly cutting it all out was surprisingly simple and fast to assemble. I did have to alter the width of the arms slightly for the card as it just wouldn't fit on otherwise. Apologies that is does also contain two retired items, but you could always substitute those.

Card Stock: Blush Blossom (retired), Real Red, Basic Black, Perfect Plum, Certainly Celery, Baja Breeze, Whisper White, Basic Grey, Vellum, Bashful Blue.
Accessories: Circle Scissors Plus, Itty Bitty Punch Pack,  standard hole punch, Heart to Heart punch, Word window punch, Owl punch,  Small oval punch, Large oval punch, Wide oval punch, Full Heart punch, Corner Rounder Punch,
slot punch (retired), 3/4" circle punch, 1/2" circle punch, 1" circle punch, Modern label punch,  Round Tab Punch, Crimper, paper snips, SNAIL, Tombow glue.

Wednesday, March 9, 2011

Elements of Style Tri-fold Card

I recently cut the base of a tri-fold card in Real Red card stock, then got time anemic and the base got put to one side and is currently buried under a pile of stuff with other UFOs (Un-Finished Objects) awaiting my attention. Then I saw a gorgeous tri-fold card Belinda N. made on an online SU demo site and in the same internet surfing session saw the latest Inkspiration colour challenge and got re-inspired to make one, (although I just went back to the site and realised whilst writing up the recipe for this card I used Regal Rose not Rose Red as my colour combination - dolt - can you tell I'm not a pink person and get easily confused!). Ohh well mistakes aside this was the result:


I really love this stamp set, Elements of Style, probably because I also love water colouring and Aqua Painters make this a really fast process to do. The circle scissors allows the perfect cutting of the centre piece for the die cut scallop circle as well, I thought about adding a second yellow layer in between the white and pink, but decided against it - was this a good thought?


I also love the distressed edges of the fancy flower (I just did this with my fingers not the distressing tool), the coloured card stock almost peels into layers to add extra depth and dimension to the card, the sponged edges also help though! Anyway the card has already been written in and is awaiting the post box in the morning - hope she likes it!


Stamps: Elements of Style
Ink: Regal Rose, Wild Wasabi, So Saffron
Card Stock: Regal Rose, Wild Wasabi, So Saffron, Whisper White, Newsprint DSP
Accessories: Big Shot, Scallop Circle die. Beautiful Wings Embosslits, Little Leaves Embosslit, Basic Pearlsm Wild Wasabi double stitched 1/4" grosgrain ribbon (retired), fancy flower XL punch, Boho Blossom punch, Stampin' Sponges, Tombow glue, SNAIL, corer rounder punch, 1" circle punch, linen thread, 1 1/4" circle punch, 1/16" hole punch, paper snips. 

Saturday, November 6, 2010

Dog Scrapbook Page

Two scrapbook pages in two days - what's going on! This page was done for a class that will be taught next week (so if you are interested in attending the class - you can see my website for details or email me). Anyway back to my page - it was done using the lovely D is for Dog stamp set and I decided to use photographs from our lovely farm dog Dinny, who sadly after +14 years of being a cattle dog died in July this year. These photographs were taken in January 2010 when we visited the farm, our son loved sitting on the dog bed patting and chatting to him, not realising that Dinny was completely deaf!


I wanted to give the effect of having a dog collar on the page, so used the circle scissors plus to cut a 5" circle an then used a sponge to age it and a chocolate chip marker to draw on faux stitching. The dog tag was made using the stamps from the set and held on using a loop of card stock and hemp twine.


There is journaling room on a pull out sheet behind the main photograph - I used the same dog stamp image on the journaling area as in the centre of the dog collar. I also thought of adding a few bone stamps on the page, but as Dinny has an "i" in it - I used it on the title instead along with letters cut from the Junior Timeless Type alphabet.


I sponged all of the edges of the 12"x12" page with chocolate chip ink as well. The random paw prints going across the page were originally just going to be a tidy border, but as Dinny had a mind and personality all of his own, I figured he wouldn't have just staying walking in one straight line! The punch art puppy dog is not my design, it is from Valita's blog, isn't he cute?


Stamps: D is for Dog, Just Believe
Card Stock: Very Vanilla, Chocolate Chip, Crumb Cake, Basic Black
Ink: Chocolate Chip
Accessories: Scallop square punch, 1 1/4" circle punch, 1 3/8" circle punch, 3/4" circle punch, small oval punch, large oval punch, 1/16" handheld punch, hemp twine, Dimensionals, SNAIL, Chocolate Chip marker pen, white gel pen, stamping sponge, paper snips, round tab punch, Junior Timeless Type Alphabet, circle scissors plus
Non SU: single hole punch


Saturday, September 18, 2010

ESAD Blog Hop - Snorkelling Scrap Pages & Butterfly Writing Set

Okay so who isn't loving everything in the new Stampin' Up! catalogue? If you have just joined the blog hop or have come here from the super talented Susan Joyce I hope that you are enjoying some terrific ideas for how to use those Big Shot dies! So get a cuppa and enjoy the journey as I hope you’re ready for the ESAD Big Shot Blog Hop!

What is ESAD?
ESAD stands for Extra Special Australasian Demonstrators and it is an online group just for Australian and New Zealand demonstrators for Stampin’ Up! We so love what we do and not only do we love to share it with our customers, friends, and wonderful blog visitors but we share our love for what we do with each other as Demonstrators. We run swaps, challenges, tutorials, product know how and cyberstamps and we are always there to help and support each other when its needed.
So if you are a Stampin’ Up! Demonstrator located in Australia or New Zealand then please feel free to click here to join our wonderful group.

I have created two different projects for this blog hop, the first is a scrap page layout using the Circles #2, Timeless Type Junior Alphabet  & Top Note dies for the super versatile Big Shot & the second is a writing compendium using the Beautiful Wings Embosslit and the Elegant lines textured impressions embossing folder.


I took inspiration for this layout from the new Celebrations DSP and extended the circle theme across the pages using the Circles #2 die, the Top Note die photos I hand cut off the perforated edge of the die to create a border around each photo. I also stamped a few of the bashful blue circles with a stamp from Circle Circus to continue the theme of the DSP.
  

Stamps: Circle Circus
Ink: Real Red
Paper: Celebrations DSP, Real Red, Bashful Blue, Pacific Point, Pear Pizzazz DSP from DSP  ( level 1 hostess).
Accessories: Big Shot, Circles #2, Timeless Type Junior Alphabet,Top Note, Circle Scissors, SNAIL, Paper snips, Stampin' write journaler, 2-Way glue pen, 

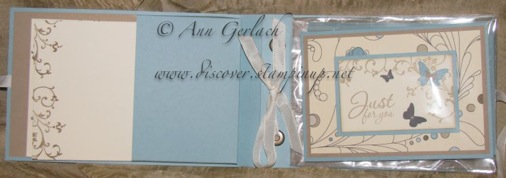
The second project is a writing compendium based on a design by Andrea Walford that I originally made in June and have remade using products from the new catalogue. It is a lovely gift as it is a compendium that holds 4 cards and envelopes all on the same theme. I chose to use the new elegant lines embossing folder which is so gorgeous and the new Elegant Soirée DSP with the new Beautiful Wings embosslits which is such awesome value - I totally love it.


Wouldn't this make the most wonderful gift? I also used the new basic pearls to embellish the cards. It's hard to see with my photography, but the embossing is so deep, it's just gorgeous and when you emboss on plain white or vanilla card stock and sponge over the top, the design pops out and looks fantastic. 


This is what the inside of it looks like:


Here's a close up of one of the cards as well - how terrific is it that Crumb Cake (kraft) is now available in an ink pad!


Stamps: Elements of Style, Afterthoughts (level 1 hostess)
Ink: Soft Suede, Basic Gray, Crumb Cake, Baja Breeze
Card Stock:Very Vanilla, Baja Breeze, Crumb Cake, Soft Suede, Basic Gray, Elegant Soirée DSP
Accessories: Paper piercer, Stampin' Dimensionals. Very Vanilla taffeta ribbon, 1" circle punch, 1 1/4" circle punch, Stamping sponges, SNAIL, Scallop edge punch, Crop-o-dile, Jumbo eyelets pewter, Sticky Strip, Basic Pearls.

Anyway congratulations for getting this far through my post! If you have any questions or comments please feel free to contact me and I will try to help out, I do have scrapbook, card and gift set classes like the above running regularly, for a calendar of events, please check my website. The next blog to hop on over to is that of Dani Fender  and you are going to love what she has made!