Okay so recycling, repurposing and upcycling things is a bit of a hobby for me - it reflects my conservation efforts in other aspects of my life. As a Stampin' Up! demonstrator whenever we get an order, it comes packaged with lots of brown paper to help protect the contents of the boxes........always important! I do use the paper as scrap paper to protect work surfaces, make paper flowers and my son makes massive collage pictures on reams of it.............but to be honest there is a limit to how much I can use so some ends up in our recycling bin. However this week I did a fun tutorial over on Crafters Anonymous and we made two different types of paper bags and the brown paper packaging is absolutely perfect for this purpose. Of course if you didn't have the brown paper packaging that I have access to - you could easily substitute it with old posters or large stiff sheets of newsprint. I used some old paper raffia for the bag handles, but you could just punch out handles using an oval die or use ribbon (I was just recycling again!).
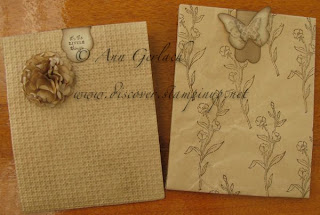
I used a variety of items to dress up the bags including texture embossing with the Big Shot (it does take two passes to emboss the entire bag), stamping directly onto the paper before assembling them and embellishing with die cuts similar to how I have done other bags in the past.
The flower is also made using the brown packaging paper with the two different sized scallop circle punches. The bags were assembled using Sticky Strip as I find SNAIL not as good for making 3D items which will hold weight or be opened a lot, the SNAIL adhesive I used for decorating the bag once it was made though.
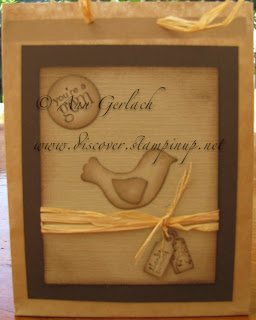
This background stamping with the flourish was done free hand so doesn't line up perfectly, but for the purpose I was happy enough with the result. The bird I stamped onto crumb cake and cut out and popped up on Dimensionals. To add longevity or bling to the handle part you could eyelet the holes after punching them with a Crop-a-dile.
This bag was decorated similar to I would plain store bought ones like I did here and here. I used sponged the edges of the die cuts & punchies and the textured crumb cake card stock to add more dimension to the bag. We also made some flat gusseted bags with the packaging paper.
Again I have texture embossed one and stamped the other. They would be perfect for packaging things like treats, popcorn, small fabric items like a scarf or similar. I would seal these bags using a stapler and cover the staple with the punched card stock closure tab and here's a side view.
Contact me if you want to learn how do make these bags as a friend is hosting an "upcycling" Stampin' Up! workshop and this will be one of the items that you will get to make and take for FREE!!
Stamps: You're A Gem, Friends 24-7, Tiny Tags
Ink: Chocolate Chip
Card stock: Crumb Cake & Early Expresso
Accessories: Big Shot, Square Lattice textured impressions folder, Vintage Wallpaper textured impressions folder, 1" circle punch, Birds & Blooms Sizzlits dies, Lots of Tags Sizzlis dies, Scallop circle punch & 2 3/8" scallop circle punch, Dimensionals, paper snips, SNAIL, Sticky Strip, Crop-o-dile, Jewelry Tag punch, Beautiful Wings embosslit die, Tombow glue, stamping sponge.
Non SU: brown packaging paper & paper raffia string.


What a great idea Ann, very innovative..... I guess I will now have to start saving my SU packaging rather than putting it in the bin :o)
ReplyDeleteLove them! They are so pretty!
ReplyDeleteNothing better than brown paper packages, tied up with string...teehee